Search This Blog

Monday, August 16, 2010

Switchover to Standby using Oracle Data Guard

  • Steps to verify databases are prepared for Graceful Switchover.


In order to switch the primary and standby database roles, (Graceful Switchover) it is necessary to make sure that all the changes from the current primary are shipped and applied to the current standby prior to switchover.

SQL> select process, client_process, status, thread#, sequence#
from v$managed_standby;

PROCESS   CLIENT_P STATUS          THREAD#  SEQUENCE#
--------- -------- ------------ ---------- ----------
ARCH      ARCH     CLOSING               1      24698
ARCH      ARCH     CLOSING               1      24695
ARCH      ARCH     CLOSING               1      24696
ARCH      ARCH     CLOSING               1      24697
LNS       LNS      WRITING               1      24699

6 rows selected.
The query above is from the primary database and shows that there are 2 LNS processes currently writing log sequence 24699.

Verify, by using archive log list command, that this is the current redo log sequence.
SQL> archive log list
Database log mode              Archive Mode
Automatic archival             Enabled
Archive destination            /mnt/prdb/archive/local
Oldest online log sequence     24695
Next log sequence to archive   24699
Current log sequence           24699
In this case the LNS processes are working on the current log sequence.


From the point of view of the standby database the RFS process is receiving a log, (sequence 24699) from LGWR and the MRP0 process is applying it.

SQL> select process, client_process, status, thread#, sequence#
from v$managed_standby;

PROCESS   CLIENT_P STATUS          THREAD#  SEQUENCE#
--------- -------- ------------ ---------- ----------
ARCH      ARCH     CONNECTED             0          0
MRP0      N/A      WAIT_FOR_LOG          1      24699
RFS       LGWR     IDLE                  1      24699
RFS       UNKNOWN  IDLE                  0          0

7 rows selected.

Once you have verified that the primary and standby databases are 
working on the same log sequence then you can proceed with the 
switchover.
  • Steps to Perform Graceful Switchover.


The following steps make sure that no new changes are being made to the current primary database and only the sys user is logged in.
1.  sqlplus@prdb> SHUTDOWN IMMEDIATE
2.  sqlplus@prdb> STARTUP RESTRICT

Step 3 prepares the changes to the controlfile so the primary can become the standby. Additionally, an end of redo marker is placed in the redo log file. This is for synchronization with the standby.
3.  sqlplus> ALTER DATABASE COMMIT TO SWITCHOVER TO STANDBY WITH SESSION SHUTDOWN;
Step 4 prepares the changes to the controlfile so the standby can become the primary. Additionally, it applies all changes in the archives and standby redo logs until it reaches the end of redo marker that was placed there by the primary. At this point the two databases are synchronized.
4.  sqlplus@stby> ALTER DATABASE COMMIT TO SWITCHOVER TO PRIMARY;

Step 5 and 6 restarts the primary database. At this point the changes made to the controlfile in step 3 are implemented and the database is now the standby.
5.  sqlplus@prdb> SHUTDOWN IMMEDIATE
6.  sqlplus@prdb> STARTUP MOUNT
Step 7 starts the remote file server (RFS) to receive redo from the new primary and also starts the managed recover process (MRP0) to start applying the changes to the database. The clause, 'using current logfile' allows real time apply to be activated using the standby redo logs (SRLs must exist on new standby).
7.  sqlplus@prdb> ALTER DATABASE RECOVER MANAGED STANDBY DATABASE using current logfile DISCONNECT;
Step 8 restarts the former standby database, at this point the changes made to the controlfile in step 4 are implemented and the database is now the new primary.
8.  sqlplus@stby> ALTER DATABASE OPEN;

*** SBLBAYDR is now the new PRIMARY ***

Reset 11gR2 ASM password

In order to change the ASM password using 11gR2 you must do the following.

1. Create a new password file under the +ASM home.

cp orapw+ASM orapw+ASM.old

2. Create new password file after removing the old one.


orapwd file=orapw+ASM password=****** entries=5 force=y

Because we are using sysasm, that information gets lost when you would choose to recreate the password file. So you have to issue another grant SYSASM to sys after doing that.

3. Grant sys to sysadm.

> sqlplus / as sysasm
SQL*Plus: Release 11.2.0.1.0 Production on Mon Aug 16 16:31:04 2010


Copyright (c) 1982, 2009, Oracle.  All rights reserved.


Connected to:
Oracle Database 11g Enterprise Edition Release 11.2.0.1.0 - 64bit Production
With the Automatic Storage Management option


SQL> GRANT SYSASM TO sys;


Grant succeeded.


SQL> exit

Tuesday, July 20, 2010

Trick to rename a column in a table filled with data in 10G

Alter a table datatype would fail if there is data in it for certain datatypes . Here's a little trick...

Create a backup of the table with the following command.
create table x_backup as (select * from x_details);

Here is the Trick:
1. Add a temporary column with the datatype you want to convert that to as below.
alter table x_details add (errortemp varchar2(100));
2. Update that column with the column you want to change so that the data populates into the new column as below.
update x_details set errortemp=errorcode; commit;
3. Drop the column that we wanted to change the datatype for.
alter table x_details drop column errorcode;
4. Rename the temp column to the column we dropped
alter table x_details rename column errortemp to errorcode;
5. Verify the data as below.
select * from x_error_details;

Friday, July 16, 2010

Oracle 11g ASM: Changed permission policy ORA-15260

A new error has popped up in Oracle ASM administration...
"ORA-15260: permission denied on ASM disk group"
Problem is if you still connected as SYSDBA to ASM out of old habit from 10g you will get it.

The SYSOPER privilege permits the following subset of the ALTER DISKGROUP operations: diskgroup_availability, rebalance_diskgroup_clause, check_diskgroup_clause (without the REPAIR option). All other ALTER DISKGROUP clauses require the SYSASM privilege.
Just use the following to connect
sqlplus / as sysasm

Thursday, July 15, 2010

ASM Diskgroup Compatibility

Diskgroup Attributes


ASM is a storage platform for Oracle databases ranging from 10g to the current version. So, an ASM instance on 11g can hold databases from 10g Release 1, 10g Release 2, and 11g Release 1 (and beyond). As long as the ASM version is at the same version or more than the RDBMS, it's possible to create a database on that ASM instance. So how does ASM communicate to the RDBMS instance if they are on different versions? Simple: ASM transforms the messages to suit the RDBMS version.

By default, the ASM instance can support 10g databases. But what if you want to place only 11g RDBMS on that ASM instance? The message transformation to support the version difference is not necessary. But what if there was a way to tell the ASM instance that the only databases supported is 11g Release 1? That would eliminate or at least reduce the message transformations. In Oracle Database 11g, that is possible, using the ASM Compatibility and RDBMS Compatibility diskgroup attributes.

First, let's check the current attributes of the diskgroup:

SQL> select compatibility, database_compatibility
 2  from  v$asm_diskgroup
 3  where name = 'DG1'
 4  /

COMPATIBILITY          DATABASE_COMPATIBILITY
---------------------- ----------------------
10.1.0.0.0             10.1.0.0.0


As you can see, the ASM Compatibility (shown by COMPATIBILITY) is set to 10.1.0.0.0, which means this diskgroup supports up to 10.1 ASM structure. Thus this diskgroup can have any RDBMS structure. The other column, DATABASE_COMPATIBILITY, shows the RDBMS compatibility set to 10.1. It means the ASM diskgroup DG1 can be used for any RDBMS from version 10.1.


Since you want to create only 11g ASM and RDBMS structures, there is no need to have 10g elements. To set the ASM Compatibility attribute of this diskgroup to 11.1, you issue the following statement (in the ASM instance):

SQL> alter diskgroup dg1 set attribute 'compatible.asm'='11.1';


Now, if you check the attributes of the diskgroup:
COMPATIBILITY          DATABASE_COMPATIBILITY
---------------------- ----------------------
11.1.0.0.0             10.1.0.0.0


The ASM Compatibility is set to 11.1; but RDBMS Compatibility is still set to 10.1. To change that to 11.1 as well, use:


SQL> alter diskgroup dg1 set attribute 'compatible.rdbms'='11.1';
Note one important point: the compatibility is set for the diskgroup, not for the entire ASM instance. This feature allows you to use only one ASM instance but cater to all types of database versions. Depending on which version is used, you can set the attribute appropriately and reduce inter-version communication.

Wednesday, July 14, 2010

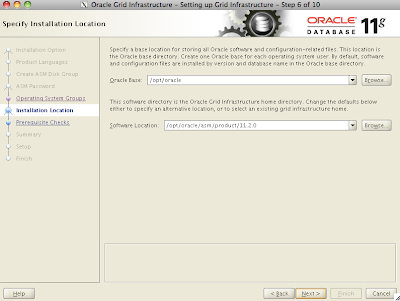
11g Rel2 Grid Infrastructure Install (single instance ASM) Linux x86-64

Scope

In 11g R2, ASM is now part of what is called the Grid Infrastructure. It is now not an option available in dbca and there is a command line option asmca which is launched from the Grid Infrastructure home. The ASM instance will be running from the Grid Home and not the database Oracle Home.
Installation Procedures
Download your binaries from OTN located at
and pick the Oracle Database 11g Release 2 Grid Infrastructure (11.2.0.1.0) for Linux x86-64.
Launch Oracle Universal Installer from you binary location of choice.
There are several new installation choices available as can be seen from the screen-shots below. What we are installing below is Grid Infrastructure for a stand alone server.


Tuesday, July 13, 2010

Common RMAN Commands

Connect to RMAN
rman target / nocatalog Connect to RMAN
rman target / catalog rman/rman@rman
Show Configurations
show all;
Backup Commands
backup archivelog all;
backup archivelog from time 'sysdate - 1';
backup archivelog from sequence 353;
backup archivelog all delete input;
backups archivelogs and deletes logs
backup database plus archivelog;
backup duration 00:30 database; -_Limits backup impact_
backup duration 00:30 minimize time database; - Limits backup impact
backup duration 00:30 minimize load database; -_Limits backup impact_
list backup summary;
list backup
report obsolete;
delete obsolete;
crosscheck backup;
backup current controlfile;
crosscheck backup;
crosscheck archivelog all;
delete noprompt expired backup;
delete noprompt expired archivelog all;
delete noprompt obsolete;
LIST BACKUP SUMMARY;
CONFIGURE CHANNEL 2 DEVICE TYPE DISK CLEAR;

Activating a Oracle Standby Database

In the event of a disaster on the primary machine, you need to make the standby database active as soon as possible. It is assumed that the primary database server is not available and that the standby database needs to be activated as the primary database immediately. The standby database will need to be activated in its current state - no other redo from the primary database will be applied as it is assumed to be down The steps involved are as followed:

1. If the standby database is in managed recovery mode, it will need to be cancelled and the instance shutdown using the IMMEDIATE option:

SQL> alter database recover managed standby database cancel;
Media recovery complete.

SQL> shutdown immediate;

2. Startup the instance and then MOUNT the DB in standby mode
SQL> connect / as sysdba
  Connected to an idle instance.

  SQL> startup nomount
  ORACLE instance started.

  Total System Global Area  252777660 bytes
  Fixed Size                   451772 bytes
  Variable Size             218103808 bytes
  Database Buffers           33554432 bytes
  Redo Buffers                 667648 bytes

  SQL> alter database mount standby database;

  Database altered
3. If possible, archive the current redo logs on the primary database and transfer them (along with any remaining archived redo logs) to the standby machine. It is assumed that the primary database and host is not available.
4. Apply the primary database's archived logs by recovering the standby database.
SQL> recover standby database until cancel;
5. Cancel the recovery and activate the standby database. A CANCEL will need to be performed as this is Incomplete Recovery. In issuing the ALTER DATABASE ACTIVATE STANDBY DATABASE command, the standby bit in the control file is reset. This process takes the database back to nomount mode.
SQL> alter database activate standby database;
Database altered.
This process can take several minutes to complete, depending on the speed of the server.
6. Shutdown and restart the new primary database. This step ensures that all file headers are reset and clears all buffers. Remember that in the previous step when activating the standby database, that command puts the database back into nomount mode.
SQL> shutdown immediate
  ORA-01507: database not mounted

  ORACLE instance shut down.

  SQL> startup open
  ORACLE instance started.

  Total System Global Area  252777660 bytes
  Fixed Size                   451772 bytes
  Variable Size             218103808 bytes
  Database Buffers           33554432 bytes
  Redo Buffers                 667648 bytes
  Database mounted.
  Database opened.
You cannot copy online redo logs from the primary to the standby in a failover scenario.
7. Shutdown the standby instance and backup if possible, then open the database for normal use. Users can now connect to the "new" primary database.
The standby bit in the controlfile is now set, so you can never go back - the standby is now your primary database. Since the redo log sequence was reset when the standby was opened, it is a good idea to take a full backup at this point.

Checking if a Sql Profile is being used

1. Check for Sql Profiles
SQL>SELECT NAME,sql_text FROM dba_sql_profiles;

2. String Check for Sql Profile Name
SQL>SELECT hash_value,sql_id,other_xml FROM v$sql_plan WHERE dbms_lob.INSTR(other_xml,'WEBLOGICII') > 0;

Monday, June 29, 2009

Oracle 11g - Active Standby Database

After reading about Oracle's 11g Active Data Guard I am very excited about pushing these new enhancements to production. First step will be to try these new enhancements out in my lab environment and seeing if they are as useful as advertised.

Following are the few notable enhancements:

1. Enabling physical standby database in read only mode while all the changes from the production database are being applied to it. This feature resemblance to logical standby database techniques in previous Oracle versions.

2. Snapshot Standby - A snapshot Standby is open for read-write which can be ideally suited for test environments, able to process transactions independently of the primary database. At the same time, it maintains protection by continuing to receive data from the production database, archiving it for later use.
Using a single command discard changes made while read-write mode and quickly resynchronizes the standby with the primary database.

For more information, read the following pdf document which is available at Oracle site.

http://www.oracle.com/technology/products/database/oracle11g/pdf/active-data-guard-11g-datasheet.pdf